Blink 예제 코드 및 설명
포스트 난이도: HOO_Junior
# Example Code
아래의 예제코드의 경우는 아두이노 (Arduino)에서 학습을 위한 목적으로 공개되어 있는 예제코드이다. [File]-[Examples]-[01.Basics]-[Blink]를 통해서 "Blink" 예제코드를 찾을 수 있다 (Figure 1).

/*
Blink
Turns an LED on for one second, then off for one second, repeatedly.
Most Arduinos have an on-board LED you can control. On the UNO, MEGA and ZERO
it is attached to digital pin 13, on MKR1000 on pin 6. LED_BUILTIN is set to
the correct LED pin independent of which board is used.
If you want to know what pin the on-board LED is connected to on your Arduino
model, check the Technical Specs of your board at:
https://www.arduino.cc/en/Main/Products
modified 8 May 2014
by Scott Fitzgerald
modified 2 Sep 2016
by Arturo Guadalupi
modified 8 Sep 2016
by Colby Newman
This example code is in the public domain.
https://www.arduino.cc/en/Tutorial/BuiltInExamples/Blink
*/
// the setup function runs once when you press reset or power the board
void setup() {
// initialize digital pin LED_BUILTIN as an output.
pinMode(LED_BUILTIN, OUTPUT);
}
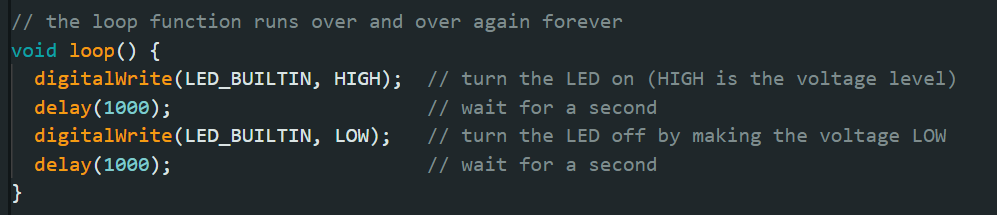
// the loop function runs over and over again forever
void loop() {
digitalWrite(LED_BUILTIN, HIGH); // turn the LED on (HIGH is the voltage level)
delay(1000); // wait for a second
digitalWrite(LED_BUILTIN, LOW); // turn the LED off by making the voltage LOW
delay(1000); // wait for a second
}# Explanations
이번 예제코드에서는 아두이노 보드에 내장되어 있는 LED 등의 깜빡임을 확인하는 간단한 코드이다. 별도의 components 없이도 아두이노 보드랑 케이블만 있으면 Blink 예제코드를 통해서 쉽게 따라 할 수 있다. Port 설정부터 프로세스나 보드 설정 등과 관련된 기본적인 아두이노 세팅이 어려운 브로가 있다면 언제든지 글쓴이에게 물어봐도 좋다.
아두이노를 다룬다는 것은 이미 C++를 다뤄본 브로들일 것이라고 본다. C++이 아니더라도 C에 대해서 다뤄본 경우 아두이노 코딩을 어렵지 않게 따라 할 수 있다. 우선 해당 코드에서 보면 setup function을 작성해서 ouput으로 나올 pin에 대한 초기 설정을 해준 것을 확인할 수 있다. 지금은 LED light에 대한 깜빡임만을 확인할 것이기에 pinMode()가 하나밖에 없지만 추후에 센서나 여러 input 및 ouput과 관련된 기능들이 추가가 된다면 setup() function에서 설정해줘야 한다.

두 번째로 Blink 예제코드의 핵심인 LED 깜빡임을 설정해 주는 function이 바로 loop()이다. loop() function을 살펴보면 digitalWrite() 기능을 통해서 LED에 가는 voltage level을 지정해 준다. 이를 통해서 LED 등을 껐다켰다를 반복하는 루프(Loop)를 만들어주는 셈이다. 다른 임베디드 시스템 코딩을 다뤄봤다면 (예를 들면 Verilog) 기계 장치에는 delay time이 필요하다는 것을 알 수 있다. 아두이노에서도 마찬가지로 delay time을 사용하는데, Blink example code에서는 delay time을 조정하여 깜빡임의 패턴 속도를 다르게 설정해 줄 수 있다. 예를 들어 현재는 1000으로 되어 있지만 이를 500이나 100으로 바꾸게 되면 깜빡임의 패턴 속도가 빨라지게 된다.
# Results


# References
'C and C++ > C and C++ Examples' 카테고리의 다른 글
| [C++ Examples/Arduino] External LED 예제 및 설명 (0) | 2024.01.15 |
|---|---|
| [C++ Examples/Arduino] Digital Inputs and If Statements 예제코드 및 설명 (1) | 2024.01.15 |
| [C Examples] 버블 정렬 (Bubble sort)을 활용해서 티켓 추첨하기 (0) | 2023.12.04 |
| [C Examples] Struct과 포인터를 활용해서 입력한 점수 저장하고 출력하기: struct, pointer (4) | 2023.12.01 |
| [C Example Code] queue를 활용한 환자의 우선 순위 나타내기: malloc(), queue, struct, point, void() (0) | 2023.11.29 |


댓글